KontroLIR Pin Outs
KontroLIR Pin Out Serial Interface
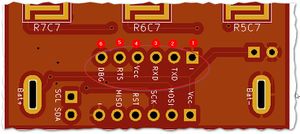
The header pins for the Serial I/F interface are laid out as follows:
- GND -ve supply power Ground / 0V
- TXD Connects to TXD on the adapter (Connected to TXD0 on the ATmega328PB)
- RXD Connects to RXD on the adapter (Connected to RXD0 on the ATmega328PB)
- VCC +ve supply power 5V (will also work with a 3V3 supply @ 8MHz or 4MHz)
- RTS Used to reset the MCU during Firmware upload
- DBG Unpopulated by default. Can be used as a debug pin, if necessary. Also connected to the LED.
Note 1: The image is looking from the keypad up. Looking throught the battery compartment, the order will be mirrored.
Note 2: On my FTDI Serial USB adapter: RTS=>DTR; RXD=>Tx;TXD=>Rx; GND=>GND; VCC=>5V.
Note 3: These pins are accessible via the battery compartment.
KontroLIR Pin Out ICSP
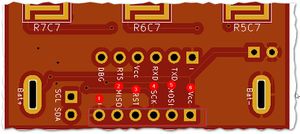
The header pins for the AVR ICSP interface are laid out as follows:
- GND -ve supply power Ground / 0V
- MISO Standard ICSP pin for use with avrdude & USBASP, Atmel ICE programmer or equivalent
- RESET Standard ICSP pin for use with avrdude & USBASP, Atmel ICE programmer or equivalent
- SCK Standard ICSP pin for use with avrdude & USBASP, Atmel ICE programmer or equivalent
- MOSI Standard ICSP pin for use with avrdude & USBASP, Atmel ICE programmer or equivalent
- VCC +ve supply power 5V
Note 1: To access these pins you must first remove the batteries and then 'carefully' open the enclosure.
Misc
There are other headers available for advanced users, as follows:
- 2-pin through hole I2C interface (SDA,SCL)
- 4-pin SMD I2C interface (SDA,SCL,VCC,GND)
- If IR receivers are not installed, then the footprints are available, along with the associated GPIO pins.
- If the I2C EEPROM is not installed, then the SOIC-8 footprint is available, along with the associated GPIO pins.
Spare GPIOs
Advanced users, may further expand KontrolIR, using the following GPIOs, if available.
- The LED pin may be reused for other purposes, if desired. (1 GPIO)
- If the IR receivers are not installed, the 2 signal pins & power supply pin may be reused. (3 GPIOs)
- If the I2C EEPROM is not used then the SDA & SCL pins & power supply pin may be reused. (3 GPIOs)

