Use with AnalysIR
If you have purchased a copy of AnalysIR, you can also use KontrolIR with AnalysIR. AnalysIR adds the possibility to record signals along with carrier frequency. You can also clean recognised signals for better performance and test sending of signals. Finally, you can export signals in IRremote format via Menu->File->Batch Export->IRremote (or IRLIB)
AnalysIR Firmware
- First request the AnalysIR firmware sketch from us by email, if you don't already have it. (File Name: sketch_AnalysIR_KontroLIR_401.ino)
- This firmware can only be used when you connect your KontroLIR to your PC running AnalysIR via the SerialUSB adapter.
- Note this is firmware for using with our AnalyIR application only. (The full KontroLIR firmware for remote control operation is different). You will receive a copy of this firmware source if you order the dual IR receivers option when purchasing your KontroLIR remote and have also purchased a copy of AnalysIR.
- Make sure you have installed support for the ATmega328PB platform or core, into the Arduino IDE. (use the minicore from MCUdude )
- Make sure to try out the example Arduino blink sketch or an example Serial print sketch to verify correct operation of the ATmega328PB with your Arduino IDE, before proceeding to use any KontroLIR or AnalysR firmware.
- Remove the batteries and connect the Serial USB adapter to KontrolIR.
- Insert the USB cable into the PC running AnalysIR & the Arduino IDE.
- Select Board "ATmega328PB Crystal Clock" from the Tools->Board Menu of the Arduino IDE.
- Select the correct COM port number of the serial USB adapter, in the Arduino IDE menu.
- Select clock speed of 16MHz for the AnalysIR firmware.
- Compile the firmware.
- Upload the firmware to the KontrolIR device.
- Close the Arduino IDE.
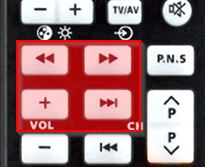
- The image below shows the location of the Dual IR receivers inside the KontroLIR remote. They are located behind the highligted buttons, which allow Infrared Light to pass through.
Follow these steps to get started with AnalysIR:
- Remove the batteries and connect the Serial USB adapter to KontrolIR.
- Insert the USB cable into the PC running AnalysIR.
- Start AnalysIR, if not already running.
- Select the COM port number of the serial USB adapter from the drop-down at the bottom of the main window.The box should turn green.
- Select KontroLIR from the source menu, in AnalysIR
- You are now ready to use KontrolIR as an IR source and emitter from AnalysIR.
- Refer to AnalysIR documentation on how to use AnalysIR.
Congratulations! - you are now ready to capture and send IR signals from within the AnalysIR application.
If you ordered the IR receiver pair option when ordering KontroLIR, you can use the Rx & Tx features of AnalysIR. If not, you can only use the Tx feature with AnalysIR. (the same applies for use with IRremote)
Note: You can purchase a copy of AnalysIr from our shop.
It is possible to customise KontroLIR using just IRremote without purchasing a copy of AnalysIR. However, AnalysIR is the leading tool available for recording and reverse engineering IR signals and is a poweful addition to any IR toolbox. KontroLIR can also work directly connected to AnalysIR and is supported for both sending and recording IR signals. (IR receiver option is required for recording signals with AnalysIR or IRremote)
